
I finally finished my first spindle full of Sheep Shed Studio roving. It's the stuff I Kool-Aid dyed forever ago and never got around to spinning because I broke the hook off my spindle. Only took a little Super Glue to fix, but sometimes I get stubborn. And lazy.

That only used up half the roving, and I'd planned to make it a two-ply, but it's pretty balanced as is and might work well as a single. I like that it's thick/thin and rustic and think plying would even it out too much.
I have 238 yards so far, out of about 4 oz.
Next up is this fabulous green/yellow/black stuff that I got in a RAK. I don't know what the fiber or brand is, but it's some kind of wool. It's combed, so the resulting yarn is super-smooth. It's also really dense and needs a LOT of pre-drafting to get it spinnable. It's not felted, the fibers just seem like they're packed really close together and need a little encouragement to seperate. Maybe it sat in a tight braid for too long.
My cousins are in town from South Florida, and were really impressed that I can actually MAKE YARN. Dan goes to antique shows all the time (he's a military history nut) and promised to be on the lookout for an affordable wheel for me.
This is the story of the most expensive skein of yarn I ever bought. This is the story of 2400 yards of Cherry Tree Hill Merino Lace that I lusted over and hemm-hawwed about justifying the expense and finally snatched for half off when the LYS was going out of business. This is the story of dropped stitches, of frogging, of woe and scissors and triumph.
That said, it's going to be a long fucking story so get comfy.
The skein sat in my stash. It called to me, "Jillie, make me something pretty. I am soft and fuzzy and wonderful and you will love me. I am like that cheesy-ass *Giving Tree* book, only better."
And I finally said "OK, Yarn! I will!" Being a brokeass from spending $30 on a skein of yarn, I dug out my free pattern stash and stumbled upon Jeanie. "Oh hey, with my laceweight, this will make a nice scarf instead of a full-sized shawl. Which will be good for my first time knitting lace."
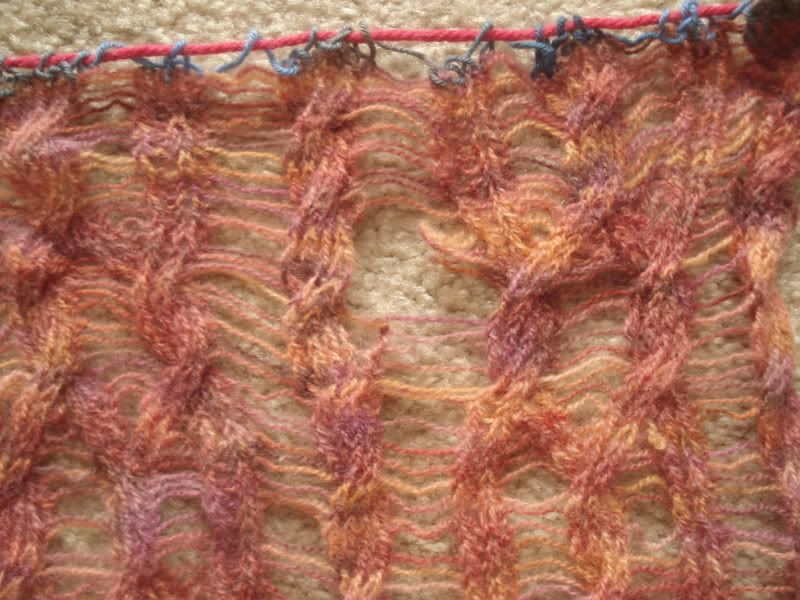
And I started knitting, and it was good. So I kept knitting, and knitting, and knitting. After a millionzillion hours, it was maybe 18" long. I decided to block it and see what it would look like.
So I took it off the needles and threaded it onto some scrap yarn. I looked up "How To Block Lace" on Google and decided to do it just perfectly right, being my First Special Project and all. So I did. I got some wires, some pins, and a towel, and I blocked that shit.
When it was dry, I gazed upon my masterpiece. "What the ever fucking fuck?" I thought. "Surely I did not put that giant fucking hole about an inch above the cast-on edge." And lo, there were 8 or 10 rows that looked like they'd been cut, making the aforementioned giant fucking hole. I cried, and shoved that shit in the closet for 6 months.
Enter today. I'm trying to clean out my giant stack of unfinished crap, and this was next on the list. "Hey," I said to myself, "I can string a lifeline right above the hole, cut off the knitting from the hole down, and only lose about 2 inches." So I dutifully started to insert my lifeline.
One problem. Did I mention the yarn is fuzzy? Well, it's fucking fuzzy, and all of the teeny-tiny skinny strands have gotten cozy and snug together, and it's impossible to get the needle in between this mess, or even to tell which stitches are where. This is not helped by the fact that the pattern is fucking ribbing and cables and dropped stitches. I gave that up pretty quickly.
"OK," I thought. "I'll just frog it and start over. It's a little wider than I would like anyway, so no harm done."
Ha. Ha ha ha ha ha ha ha. Did I mention the yarn is fuzzy. Yeah. In about half an hour, I'd managed to frog maybe an inch. At this point I realized the stupidity of spending days frogging to get kinky, pilly yarn when I had more than 2000 yards of the stuff in pristine condition in the other room.
But what to do with the stuff I already knit?
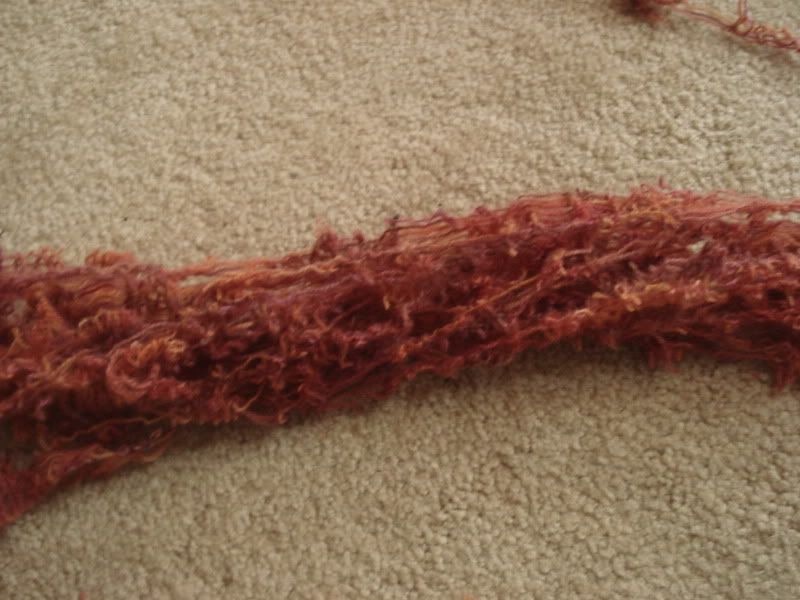
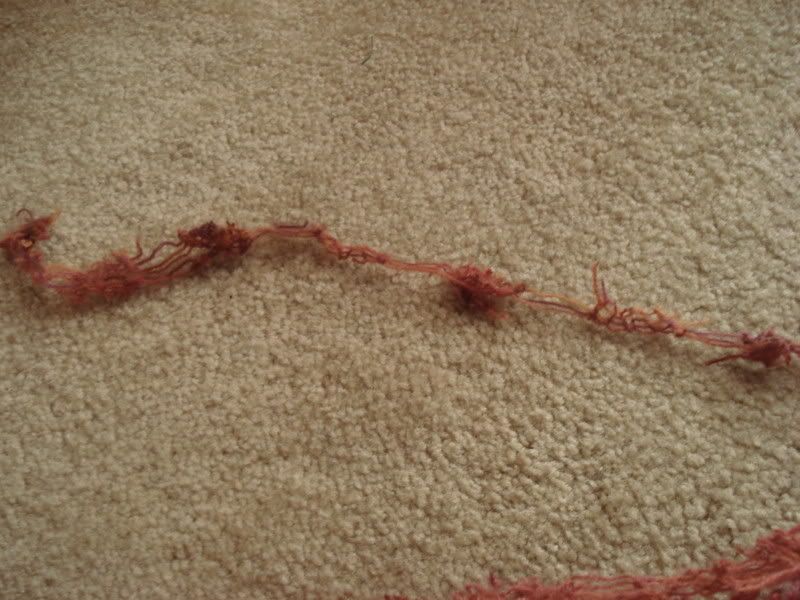
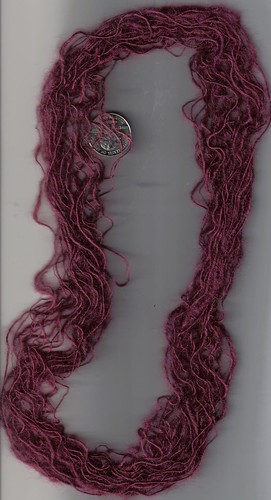
I took my trusty scissors and I CUT THAT BITCH UP.
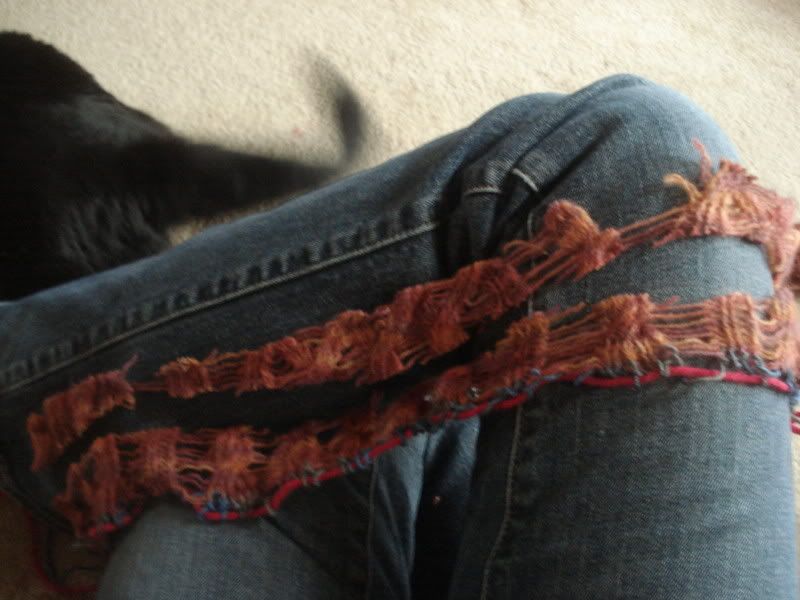
I cut it all up into 3/4" wide strips. I grabbed both ends and yanked on them and stretched them out. I made crazy-ass yarny stuff with knitted chunks in it:
"OMG!" you say. "Jillie, you destroyed teh speshul handpainted espensive yurns!"
And I say, "Yes, bitches, I did. And I fucking liked it."
What wonders are to be found at the local library!
I was wandering through in search of a book on Microsoft Office for my mother (try as I might to teach her, she just needs to have instructions open in front of her), when I stumbled across this title. A book on spinning, written by someone who started out with no knowledge at all and got to be an expert? Sounds like a good read to me!
Before you pick the book up, realize that it was published in 1971. This may make it seem a bit "dated" if you're expecting glossy pages, artistic photographs, and modern prose. You're not going to get any of that. My copy smells a bit musty, there are no photographs, and the writing style isn't like the knitting books I'm used to. What you do get is well-drawn (and sometimes funny!) black-and-white illustrations, and an interesting approach to the subject matter.
Rather than writing as an instruction guide, Marilyn Kluger tells you a story. She starts with her first exposure to spinning at her grandmother's house, gives you tips on finding a wheel based on her own experience, and explains what she found was the best way to detangle and clean a raw fleece. Reading her book, you feel like you're learning right along with her, not being lectured.
The book does focus mainly on wheel spinning, but even as a spindler I found things to appreciate. There is one chapter on using a hand spindle, and the sections on finding, preparing, and dyeing fiber are useful to spinners of all tool preferences.
Maybe someday I will pick up a wheel and put more of the book to use, but for now I'm happy to appreciate what I can. After all, we're all just making string out of sheep.
"Something old, something new
Something borrowed, something blue"
-Old Wedding Proverb
I think I've got all my bases covered.
In November, I went to a needlework festival and bought a few ounces of Colonial wool top:


Some of it I spun right away:

But the rest languished in my stash until recently.
A few days ago, I had a spinning kick. Since my usual spindle was still packed up (I just finished moving), I borrowed a dowel rod and a couple of CDs from my dad and got going. I ended up with a beautiful new single, in a lovely shade of navy blue.


After tracking down my own spindle, I plied the newly-spun blue single with the old grey one to get a very-full spindle of bulky 2ply yarn.


Once I got the yarn washed and skeined, I noticed how much my spinning has improved in such a short amount of time. My finished yarn has hardly any excess twist, and doesn't worm at all when two strands are held together. I've learned to be more intuitive as I spin, making the yarn the thickness and amount of twist it wants to be rather than trying to force it to be something it's not. I'm still not very good at getting a consistent thickness unless I do a lot of predrafting, but that will come with time.


The finished yarn is called "Heidi", because I plied it while watching "Project Runway". There are 46 yards, weight of 2 oz, and it's bulky (7 wpi). Outdoor photos taken with a crepe myrtle bush.
I don't know what to make with it yet. It's very fuzzy, so nothing that needs to be durable. I was thinking of perhaps a hat or a neckwarmer (like a Pidge).
We all know hand-dyed yarn is gorgeous and to be coveted. and something you dyed yourself is even more so, since it's completely one-of-a-kind and custom-made to your own tastes.
But sometimes we don't want to jump in to dyeing our own fiber. Maybe you have small children and don't want them accidentally playing with potentially-toxic chemicals. Maybe you don't want the hassle of keeping your dye pots and utensils separate from your cooking pots and utensils. Or maybe you're on a budget and don't want to spend a lot of money on dyes, mordants, and all the other supplies you'd need to get started.
Well, no more excuses for you! There is a way to home-dye that's cheap, non-toxic, and easy. All the necessary supplies are available at your grocery store, and you probably already have most of them at home. What would you say to that?
Personally, I say....

Yes, that's right, Kool-Aid. It comes in tons of colors, and you can mix them to make even more. It's acidic, so it will dye protein fibers (wool, silk, alpaca, soy... I even used it to dye my hair as a teenager).
You can use any microwave-safe plastic or glass bowls you have on hand. Some people use metal, but personally I shy away from them because they could potentially react with the acidic dye. Since everything you're using is non-toxic, you can go back to using them for food after a wash. They may stain a little, but the residue isn't harmful.
You need:
1. Your protein-based yarn or fiber. You can use a blend if you like, but the colors won't come out as vibrant and may fade more quickly. For this batch, I used a 100% wool roving.
2. Lots of Kool-Aid. For bright colors, a good rule of thumb is one packet of Kool-Aid per ounce of yarn. For less saturated colors, use less. Since I wanted a semi-solid with some fiber left white, I used one packet per two ounces. The color is called "Ice Blue Raspberry Lemonade".
3. Water.
4. A few large bowls, plus cups and spoons for mixing.
5. A turkey baster, paintbrush, or other method of applying dye (for painting). I love to use my
basting bottle.
6. Your microwave
7. A plastic sheet (such as a tarp or garbage bag) to protect your workspace.
Step 1: Wash Up
Fill your sink with water, and swish in a little bit of wool wash or detergent. Wash your yarn and rinse well. Then drain and re-fill the sink with clean water. Let the yarn soak until you're ready for it.
Step 2: Mix Up
Do you want your yarn to be solid or painted? Solid yarn will be the same color all the way through. Painted yarn will look mottled, variegated, or striped depending on how you apply it.
For a solid yarn, add some water to a large microwave-safe bowl (make sure to leave room to submerge the yarn!). Then dump in the Kool-Aid packets and mix well. The ratio of water to dye doesn't matter, just the ratio of dye to yarn.
For a painted yarn, mix your packets with water in a cup (coffee cups work well for this). Again, the ratio of dye to water doesn't matter. I use about 1/2 cup water per packet of KA.
Step 3: Time to Dye
If you're making a solid yarn, this next step is simple! Just dunk the soaked yarn into the dye bath, making sure it's all covered up.
If you're making a painted yarn, this is the fun part. Lay the wet yarn out on your plastic, and start painting. You can drip, pour, squirt, brush, or splatter the dye on. As mentioned before, I use a basting bottle, which lets me do a little of each. Get creative, and have fun. When you're satisfied with your results, transfer the dye-covered yarn to a microwave-safe bowl.
Step 4: Cook It
Heating the yarn/dye/water mix will help the fiber absorb all the dye and make it permanent. Just stick the whole thing in the microwave, covering it loosely with plastic wrap to avoid splattering.
I heat mine in 2 minute cycles: cook for 2 minutes, let cool for 2 minutes. Repeat until the water looks mostly clear (which meand the yarn is absorbing most of the dye). My batch today took 4 cycles to get clear, depending on how powerful your microwave is and how much dye you used, yours may be more or less. Just keep going until it looks right!
Step 5: Cool It
When the water is clear, drain it off (leaving the yarn in the bowl), and let the fiber cool to room temperature. In the meantime, grab some sock knitting you've been procrastinating on.
Step 6: Rinse Clean
Once your yarn is cooled off, it's time for the final wash. Get a stream of running water close to the same temperature as the yarn, as sudden changes in temperature can cause it to felt. You may see a little dye coming out in the water, or you may not. Either way is no cause for concern.
Step 7: Oh, Hang It All
Your dyeing experience is done! Now all you need to do is hang up your yarn to dry.
To make it dry faster, I like to lay out the yarn and gently squeeze it between two towels. Be sure not to wring or twist, as this can break fibers. Just press it gently. This step is optional, but if you do it, you'll have much faster drying.
Now hang the yarn someplace well-ventilated. I do it in my bathroom, or outside on a sunny day.

Once it's dry, you're ready to enjoy your results! Isn't custom yarn a beautiful thing?
I am very, very proud of myself today. I completed my first start-to-finish project, from roving to knitted item.
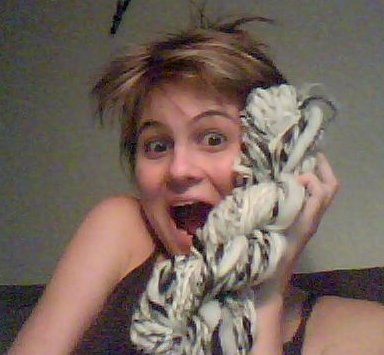
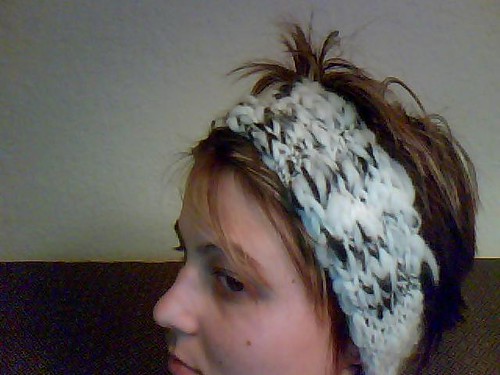
Photo progression, from roving to yarn to headband:
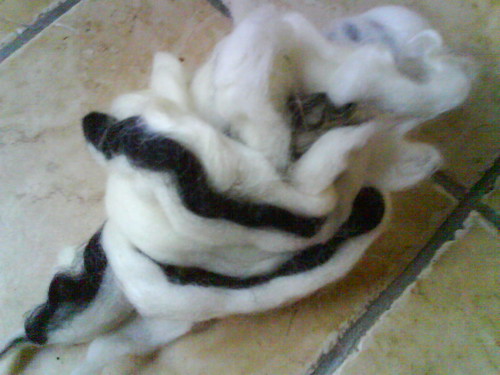
The roving is a black-and-white striped mill end from The Sheep Shed Studio. It came as a "free gift" when I ordered two pounds of white roving. I'd guess it weighed about 4 ounces, give or take a few.
The yarn I've decided to call Moki, after one of the white tigers at Busch Gardens Tampa. I met him last week :3
Yarn stats:
- Woolen-spun (meaning the fibers go every which way instead of being combed to go in the same direction, resulting in a loftier, fuzzier yarn)
- 2 Ply
- Thick-and-thin and slubby (the thinnest parts are laceweight, thickest are super bulky. I'd say it's a bulky on average)
- 100% wool
- Spun on a drop spindle
- 38 yards per 4 oz
- Knits to 11 sts/4 inches on size 10 needles
- Ravelry page
I was so excited about the yarn (my first plied yarn so far) I couldn't wait to make something. There wasn't enough for a hat, which is what I
really wanted, so I decided to settle on a nice wide ski headband (Yes, I know, a ski headband in July, I'm addicted to fresh powder).
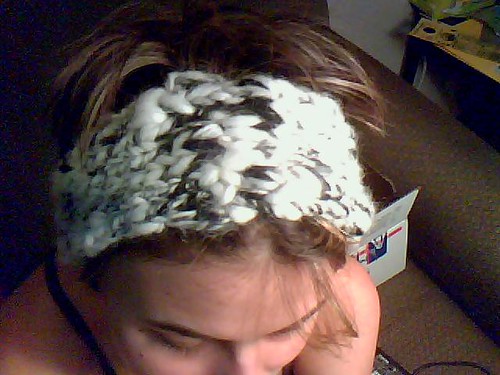 Headband stats:
- 3" wide
- 20" long (stretches to fit my 24" head)
- Size 10 needles (OK, one 9 and one 10, I couldn't find a pair of either... you caught me.)
- Uses 27 yards
- Knit as a rectangle with two ends grafted together
- Slipped stitch edge
- Makes me lust for the mountains.
- Ravelry page
I am in love with this thing. It's warm, it's pretty, and it came out exactly how I wanted it to.
How many months until winter?
My order from the Sheep Shed Studio came in today! (First of all, WOW is that ever fast shipping, I ordered it on Thursday and it came all the way from Wyoming... thanks Priority Mail!)
The first thing when I opened the box was this roving. It's a little "sample", about 1 oz of fibre. I've heard that Carol always includes a little "gift" with orders. Looking at the website, it looks like a mill end from the "Blacks" category.

I love the texture of it. It's a little coarse, and the fibers have a slight crimp to them. They tend to stick together rather than pulling apart easily. It will probably need a little pre-drafting before I spin it.
Now for the real treat...

That's two whole pounds of white roving, exploding out of that teeny little box. It came sealed up in a bag, so I didn't have to worry about damaging the fiber as I cut the box open. It must have been vacuum-packed, because it sprung to life immediately when I opened the box. Luckily I'm working with this right away and won't have to worry about packing it back in!
The roving is soft, cloudlike, and luxurious. I've read that sometimes the Sheep Shed rovings have a little bit of pink-tinted mohair in them, but this lot doesn't appear to have any. Whether you get some or not is all luck of the draw, a nice surprise in my opinion. I picked a few fibers out and they appear to be mostly uncrimped, with an average staple length between 1 and 3 inches.
So what's all this for?

A scarf. I nidding one.
Today I'm talking about The Sheep Shed Studio, a company located in Wyoming.
The Sheep Shed team buys unspun fiber from Brown Sheep and processes it to re-sell. They offer mill ends (imperfect rowing requiring a little more work by the spinner) and "grab bags" of fiber (smaller pieces of roving, batts, etc), as well as regular high-quality rovings.
The mill ends come sorted by color, "brown tones", "black tones", "blue tones", or "Whites". You order by the pound.
The rovings come in a wide assortment of colors, and Carol also hand-dyes some of the rovings into beautiful variegated colorways. These cost a little more, but are worth it if you don't know how to dye yourself and still want a gorgeous, hand-painted yarn.
I placed an order for two pounds of white mill ends (only $25 including postage/handling!) yesterday morning, and received a confirmation by 8 PM, saying that my order is going to be packaged and shipped by Monday. So far I'm very impressed by the professionalism and quality of service.
I'll give you another update when I get my order!

See that? It's a broken DPN, and the reason I haven't made any progress on my basketweave socks in weeks. I thought I'd have to buy a new set of needles, but someone on the Ravelry forums told me Brittany will generally replace broken needles for free! I sent an email a couple of days ago. I haven't gotten a response yet, but hopefully I will soon so I can get on with the knitting!

In the meantime, I've been working on a new pair of socks. It's a total re-write of Grumperina's Jaywalker pattern, applying a similar stitch pattern to a different sock. I'm calling them Skywalkers. There's a lot more info about them on their Ravelry project page (Socks for Great Justice), but I'm holding off on posting the actual pattern until I have both finished.
Here's a technical preview:
They're big! They should fit a men's size 10-12, or a women's 12-14.
They're toe-up! It's easy to make sure if you have enough yarn left over for the second sock.
They're more zig-zaggy! I modified the stitch pattern so the zigzags are more pronounced.
They have shaping! Ribbing on the instep keeps them fitting well, especially if you have a high arch.
They're crew-height! Great for people who don't wear dress socks.
They have short-row toes and heels! Nice-looking, sturdy, and easy to do.
Two weeks ago, I went to the Orlando Needlework Convention at the Orange County Convention Center. It was held along with a scrapbooking show and a beading show, three in one. All of them were pretty impressive, though I was a little disappointed that there were so few vendors selling yarn.
I did pick up some spinning goodies from one of the quilting booths (Boutique 4 Quilters Inc)...
Top to bottom: 30 silk cocoons (0.5 oz), 1 oz Colonial Top roving in Koala, 1 oz Colonial Top roving in Slate


I spun up a little of the Koala, it's so soft, pretty, and easy to work with. Nice long staple length too, without being too long. It's only one spindle-full so far, about 23 yards. Mostly DK to worsted-weight, with a few thinner spots. I'm thinking of plying it together with the Slate.

Silk-processing has been an adventure so far. I managed to degum the cocoons with some help from Worm Spit, and ended up with this fine mess of a thing:
I don't have any carders yet, but I did pick it apart a bit to untangle the fibers and see what the fiber comes out like. Nice! I think I'll like spinning this, once I get it out of "poofy tangled cloud" stage.

Of course, all of this spinning has a purpose! It's going into a portfolio project I'm working on. More on that to come later, or get a sneak preview photo in Ravelry.
I realized I haven't shared any photos of my Tetris Afghan-in-progress lately, so here are two.
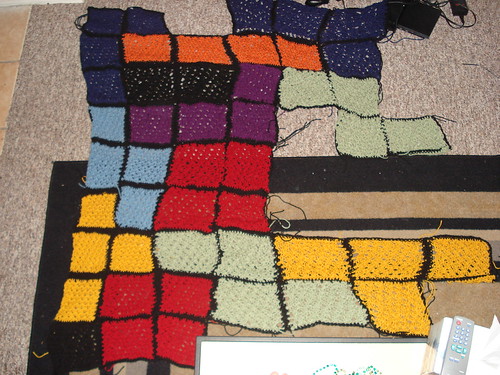

It's not really that wobbly, just laid out crooked. And look at all those damn ends I'm going to have to weave in.
I also finished my second full spindle of yarn, 21 yards, so that makes 33 total! I still have roving left to spin, I don't know how much yarn I'll end up with.
Laugh at me if you will.
My attempts to spin "properly" failed like crazy a few months back. I threw away the spindle I was trying to learn with, and basically left the roving sitting all alone in a storage box.
Until yesterday... when I found my wool, a screwdriver, and a dream.
Here's my spindle:

And my yarn! About 12 yards (half an ounce) of wool. It's different thicknesses in different parts, ranging from laceweight to worsted, but the majority of it is about fingering-weight.

Next item on the agenda: spin up the rest of the roving (about 1/2 ounce more) and knit it up into a scarf or something similar.


